
Composting Tumbler Tips: Your Quick Guide to Success
Composting is one of my favorite ways to reduce waste and create nutrient-rich fertilizer for my garden. I was honestly scared to start composting because I thought it would be difficult and smelly. Turns out, with a tumbler, it’s neither (see what I did there?)! I’d like to share some helpful composting tumbler tips for using a compost tumbler effectively, aiding in quicker decomposition and better results for your garden.

How does a compost tumbler work?
A compost tumbler is a container that is designed to facilitate the composting process. It typically consists of a drum or barrel that can be rotated manually or with the help of a crank or handle. The tumbler allows you to easily turn and mix the compost materials, providing aeration and accelerating decomposition.
As an Amazon Associate, I earn from qualifying purchases. Please visit my privacy + disclosure page for more details.
Choosing the Right Composting Tumbler
Tumbling Composter vs Stationary Compost Bin
In my experience, the choice between a tumbling composter and a stationary compost bin depends on personal preferences, available space, and desired level of involvement. I’ve found that tumbling composters, sometimes also called rotating composters, are usually more compact and make turning compost easier. Simply giving the tumbler a spin mixes and aerates the compost easily, saving time and effort.

Grab your Free Routine
The 15 Minute Homestead Routine (for busy days).
Want a simple morning rhythm that keeps your home running, your garden growing, and your goals on track? Grab my free 15-Minute Morning Routine Worksheets—designed to help you build homestead habits that stick.
On the other hand, stationary compost bins tend to be larger and are easily handmade and thus, cheaper. With a stationary compost bin, you need to use a shovel or pitchfork to turn the compost, which requires more physical work. However, the larger size also means it can handle more compost materials and will produce more compost at the end of the process.
How do I select the right size and capacity for a compost tumbler based on my needs? When selecting a compost tumbler, consider the following factors:
- Available space: Measure the area where you plan to place the tumbler to ensure it fits comfortably.
- Amount of compostables: Estimate the volume of organic waste you generate regularly to choose a tumbler with an appropriate capacity.
- Frequency of composting: If you generate a large amount of waste frequently, a larger tumbler or multiple tumblers may be more suitable.
- Turnability: Consider the weight of the tumbler when filled with composting materials and ensure you can easily rotate it.
- Budget: Set a budget and choose a tumbler that offers good value for money while meeting your composting needs.
Pro Tip
Only buy a compost tumbler with two sections, so you can add fresh materials to one side while the other side has time to decompose.
Insulated Bin for Cold Climate
If you live in a cold climate, using an insulated tumbler or compost bin can help to ensure efficient composting. Insulated tumblers are designed to keep the heat generated by the composting process inside, maintaining a higher temperature for optimal breakdown of materials. Here are some benefits of using an insulated tumbler:
- Speeds up the composting process by retaining heat.
- Protects compost from freezing temperatures, enabling year-round composting.
- Reduces odors since the tumbler seals in heat and prevents moisture from escaping.
In conclusion, choosing the right compost tumbler depends on several factors, including personal preferences, space, climate, and desired level of involvement. As for me, I’ve had success with my cheap rotating, tumbler!
Check out this post for more on composting in winter!
Understanding Composting Materials: Getting the Right Balance
To begin with, maintaining the right balance of green (nitrogen-rich) and brown (carbon-rich) materials is essential for a successful composting process. You’ve probably read that before. But what the heck am I talking about? I think it’s either to think of it as dry or wet. The brown stuff is dry and dead, and the green stuff usually still has moisture (this is not a hard rule, just another way to think about it if you get confused).
I’ve found that a ratio of approximately 3:1 (brown to green) works best in a tumbler. This balance helps to control any unpleasant odors, as well as ensures a steady supply of nutrients for the composting microorganisms. To be honest though, I don’t always follow my own rules! Here’s the basic guideline:
- Green materials (nitrogen-rich): 1 part
- Brown materials (carbon-rich): 3 parts

Green Materials and Nitrogen
These materials are rich in nitrogen and provide the necessary nutrients for decomposition. Some examples of green materials include grass clippings, vegetable scraps, coffee grounds, and fresh yard waste. Nitrogen-rich materials help to speed up the composting process and create a healthy environment for microbes.
Brown Materials and Carbon
Another vital part of composting is the inclusion of brown materials. These materials are rich in carbon and provide energy for the microbes that break down organic matter. Examples of brown materials are dry leaves, wood chips, and other brown waste from your yard. Carbon-rich materials help to maintain the right balance in your composting tumbler and prevent the compost from becoming too wet or smelly.
To create a well-balanced compost, make sure to layer brown and green materials. Here’s a simple breakdown of the materials:
- Brown Materials: Dry leaves, twigs, cardboard, and straw
- Green Materials: Fruit and vegetable scraps, coffee grounds, and grass clippings
For a printable list of more items you can compost at home, check out this post on composting basics.
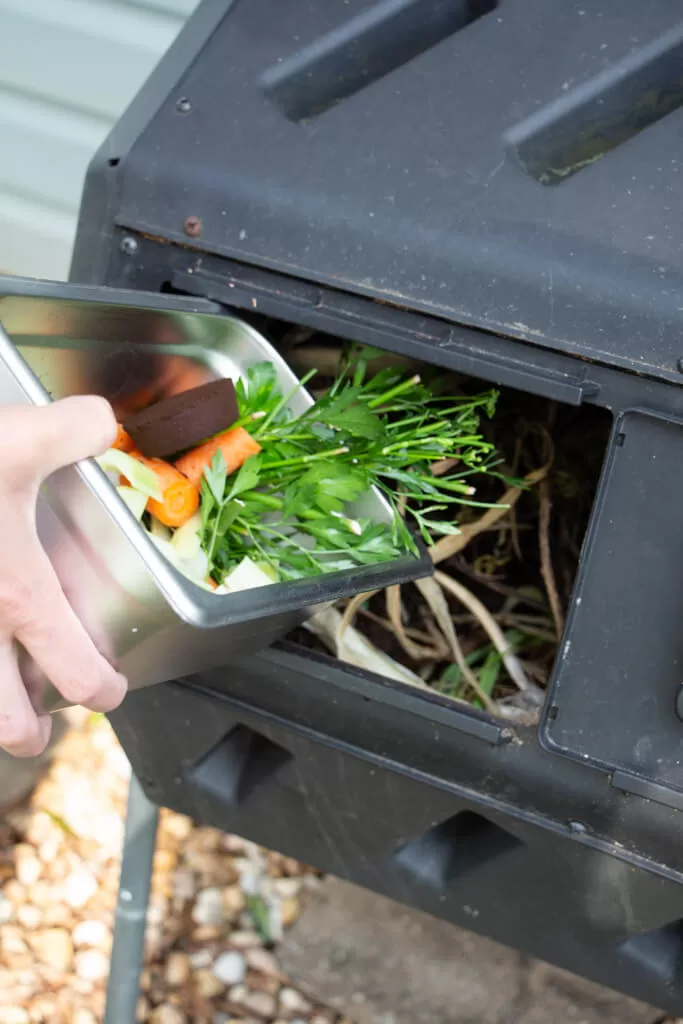
Kitchen Scraps and Yard Waste
I’ve found that composting tumblers work best with a mix of both kitchen scraps and yard waste. When it comes to kitchen scraps, stick to raw vegetable scraps, fruit peels, and other uncooked organic materials. Avoid including meat, dairy, or fatty foods as these can create unwanted odors and attract pests. Too much citrus can also cause issues. Yard waste such as small branches, leaves, and grass clippings should be added in moderation to maintain the right balance of green and brown materials.
Breaking Down Materials into Smaller Pieces

Breaking down materials into smaller pieces before adding them to a compost heap is essential for creating rich compost. Making sure all items are cut or shredded into smaller sections helps the microorganisms decompose the material quickly and efficiently.
Layering Brown and Green Materials
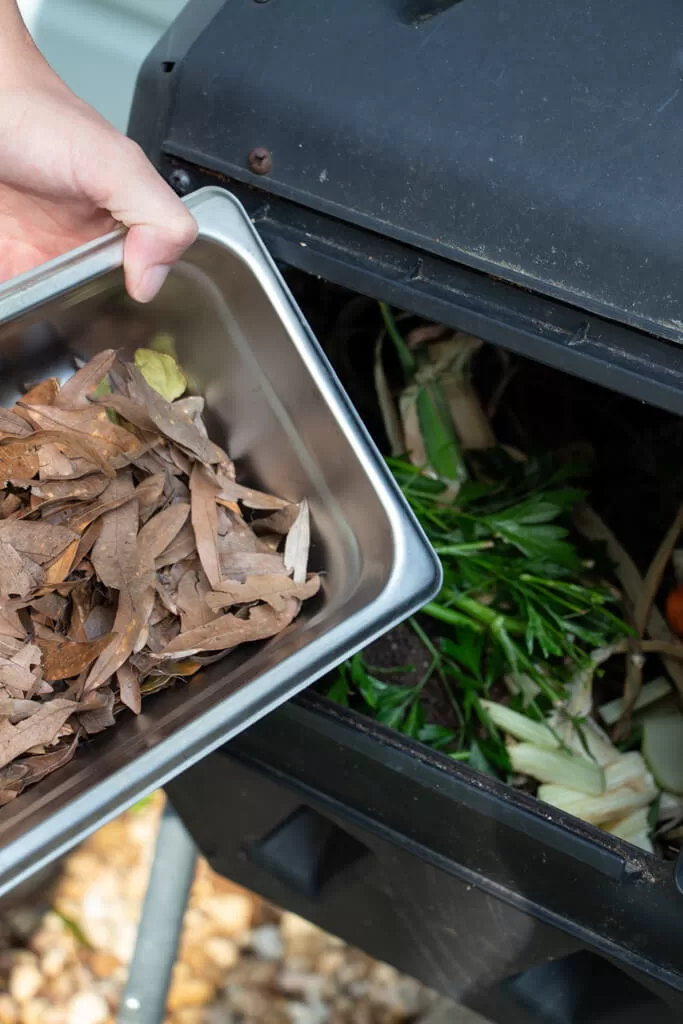
By alternately layering these materials, you can ensure that the compost heap has a good balance of carbon and nitrogen, which is vital for successful composting.
Tips for Better Composting in a Tumbler
Now that you’ve got the basics, here are more composting tumbler tips to take your composting from “good” to “great!”.
Compost Activator and Decomposition Process
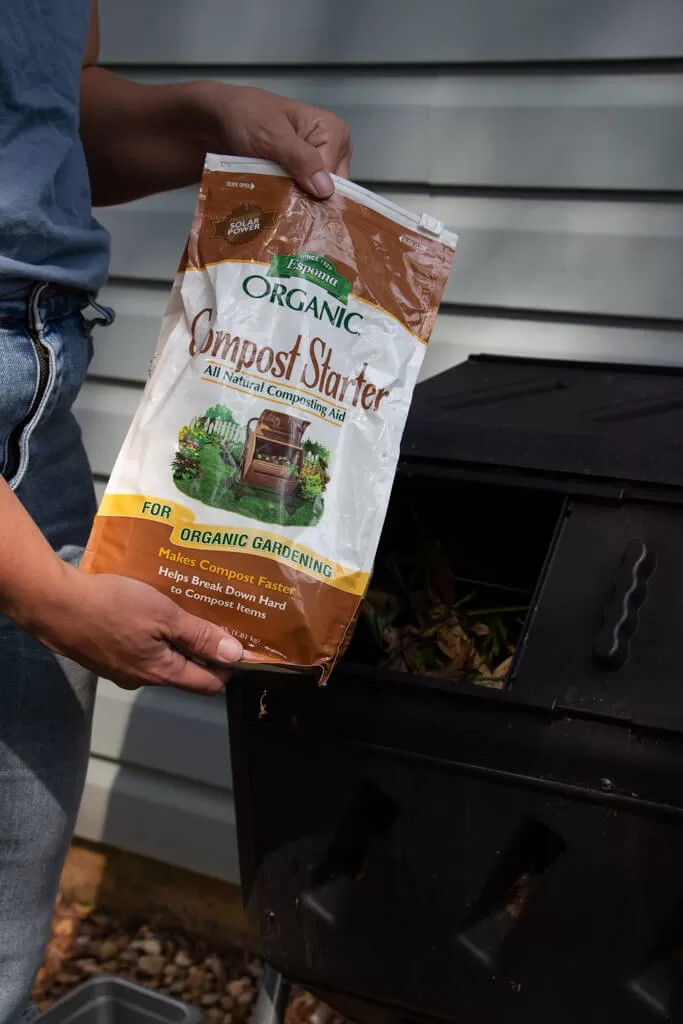

Using a compost activator really helps kickstart the decomposition process in my compost tumbler. I’ve noticed that adding a layer of activator to new material significantly speeds up the process and delivers the best results. I add in more about 2-3 times a year.
Managing Unpleasant Odor and Excess Moisture
Another important factor to consider when using a composting tumbler is the moisture content of the materials. A well-maintained compost tumbler should have a moisture content of around 40%-60%.
The best way to regulate the moisture content is to keep an eye on compost materials. For example, if I notice the compost is too dry, I can add water or moist food waste to the tumbler. Conversely, if the compost is too wet, I add more carbon-rich materials like leaves or straw to absorb the excess moisture. Personally, I just keep the greens and browns in check, and the moisture seems to regulate itself.
Unpleasant odors and excess moisture can sometimes be an issue in compost tumblers. To manage these problems, follow these steps:
- Aeration: I ensure that my tumbler has adequate ventilation by turning it regularly.
- Moisture Balance: If the compost becomes too moist, I add brown materials to help absorb excess moisture.
- Odor Control: If my compost starts to smell, I add more brown materials and make sure to turn the tumbler more frequently for better aeration.
Monitoring and Maintaining Your Tumbler
Turning and Tumbling Frequency

It is important to regularly turn the compost tumbler. By rotating or turning the tumbler every few days, it allows for increased oxygenation, which in turn speeds up the decomposition process. Additionally, this practice helps to prevent material from clumping together and ensures a more even distribution of moisture within the tumbler.
Turning and tumbling the tumbler creates direct contact between the ingredients and allows oxygen to enter, which accelerates the composting process. A larger surface area and smaller pieces of materials also help increase the speed of decomposition.
Checking for Finished Compost
To know when the compost is ready, look for these certain signs. Finished compost typically has a dark, crumbly texture, quite similar to garden soil. It should be pleasant-smelling and free from any recognizable food scraps or garden waste.

If you want to test to be sure your compost is ready, you can transfer a small portion of compost into a container (ex. bin or 5-gallon bucket) and let it sit for a few days. If you don’t notice any foul odor and the material’s appearance remains consistent, then consider it finished compost.
How Long Does it Take to Produce Compost in a Tumbler?
Since every composting tumbler has a different design and capacity, the duration to produce finished compost can vary. In my experience, it usually takes about 6 months to get a new pile started, then about 3 months to create new compost from there. I have heard of people making it faster, but that has not been my experience.
Composting in Different Climate Conditions
Optimizing Compost Production in Winter Months
In cold climates, composting during the winter months can be challenging. To keep a compost pile active, keep adding new materials and turning the tumbler regularly. The process is much slower than in the warmer months, but it should still work!
During winter temperatures, the best option for composting is a tumbler. It takes a long time for open compost piles to break down because their ambient temperatures are lower.
Composting in High Temperature
In high temperatures, ensure you compost pile does not dry out or overheat. Add more browns to the mix to balance out the excess moisture and heat from the greens. Avoid direct sunlight by placing the compost tumbler in a shaded spot.
By doing so, you can maintain a healthy balance of microorganisms, which helps speed up decomposition and prevents the pile from becoming too hot or smelly.
Should I find a Sunny Spot for Composting?
A sunny spot may seem like a perfect location for composting, but exposure to excessive sunlight can be detrimental. Too much heat can quickly dry out the compost and kill off the vital microorganisms needed for decomposition. To avoid these issues, choose a partially shaded area that allows for some sunlight while protecting the compost tumbler from overheating.

FAQs about Composting Tumblers
Alternatives to Tumbler Composting
If you don’t have access to a composting tumbler, using an outdoor compost bin works well as an alternative. These bins can handle large amounts of garden waste, green waste, and kitchen scraps.
To ensure optimal decomposition, make sure to place your outdoor compost bin in a good location. Direct sunlight helps speed up the process. Unlike in tumblers, an open pile is less likely to overheat. The best way to maintain a healthy compost pile is to turn it regularly with a pitchfork or shovel to aerate it.
For those who prefer a more hands-off approach, worm composters (vermiculture) are an excellent option. These composting systems use worms, typically red wigglers, to break down organic materials. When using a worm composter, make sure to provide the worms with the proper environment, such as a moist bedding material and a well-ventilated container.
I hope these composting tumbler tips help you on your composting journey! If you ever have any questions, feel free to reach out in the comments!
Pin these Composting Tumbler Tips for Later!

About the Author
Brittany Gibson is a modern suburban homesteader and the founder of The Homestead Challenge. She empowers women to adopt a simpler, more self-sufficient lifestyle, feeling confident to grow, create, and thrive on their own terms with joy and balance.
Read more about my transformation and join me in building our lives from scratch.